Hi guys, I am rebuilding my engine and I am moving on to painting some of the parts. I want to repaint the valve cover in the same black colour it came from factory. I do have some black engine spray paint, but it has a gloss finish, instead of the matte finish from factory. Can anyone recommend a paint or paint type that would give a finish that is close to factory? Thanks.
It is not painted. It is satin matt crinkle powder coat. You will need to find a powder coater who is knowledgeable in coating aluminium. Make sure that they do not sandblast any critical parts or allow powder to get on the inside.
A video is being done for this job but I am a little bit behind at the moment.
5 Likes
Alright, thanks Joe. 
Recently had mine done. It chemical stripped it myself and it went to a retired pro for painting. Its not wrinkle though just matt black
I am in the process of stripping more covers to have some more to sell
5 Likes
Which chemical do you use Kiran. Most chemicals seem to be banned in the UK now without a license.
Ill get a pic of it, its a general paint stripping gel from the range.
I went heavy with it and left it for a few days and it lifted it all off, stiff brush and a wash and it was all clean
Am trying to be more conservative with it this time and find the balance of just enough
1 Like
Thanks. I’ll give that a go because sand blasting comes with the risk of a piece of sand getting inside the cover and not washing out properly.
1 Like
Yeah, thats why i did it myself this way to try get round that risk of shot blasting
Also am paying more for a pro to do it with a high work ethic than giving it to anyone to sparay to avoid paint o the rear

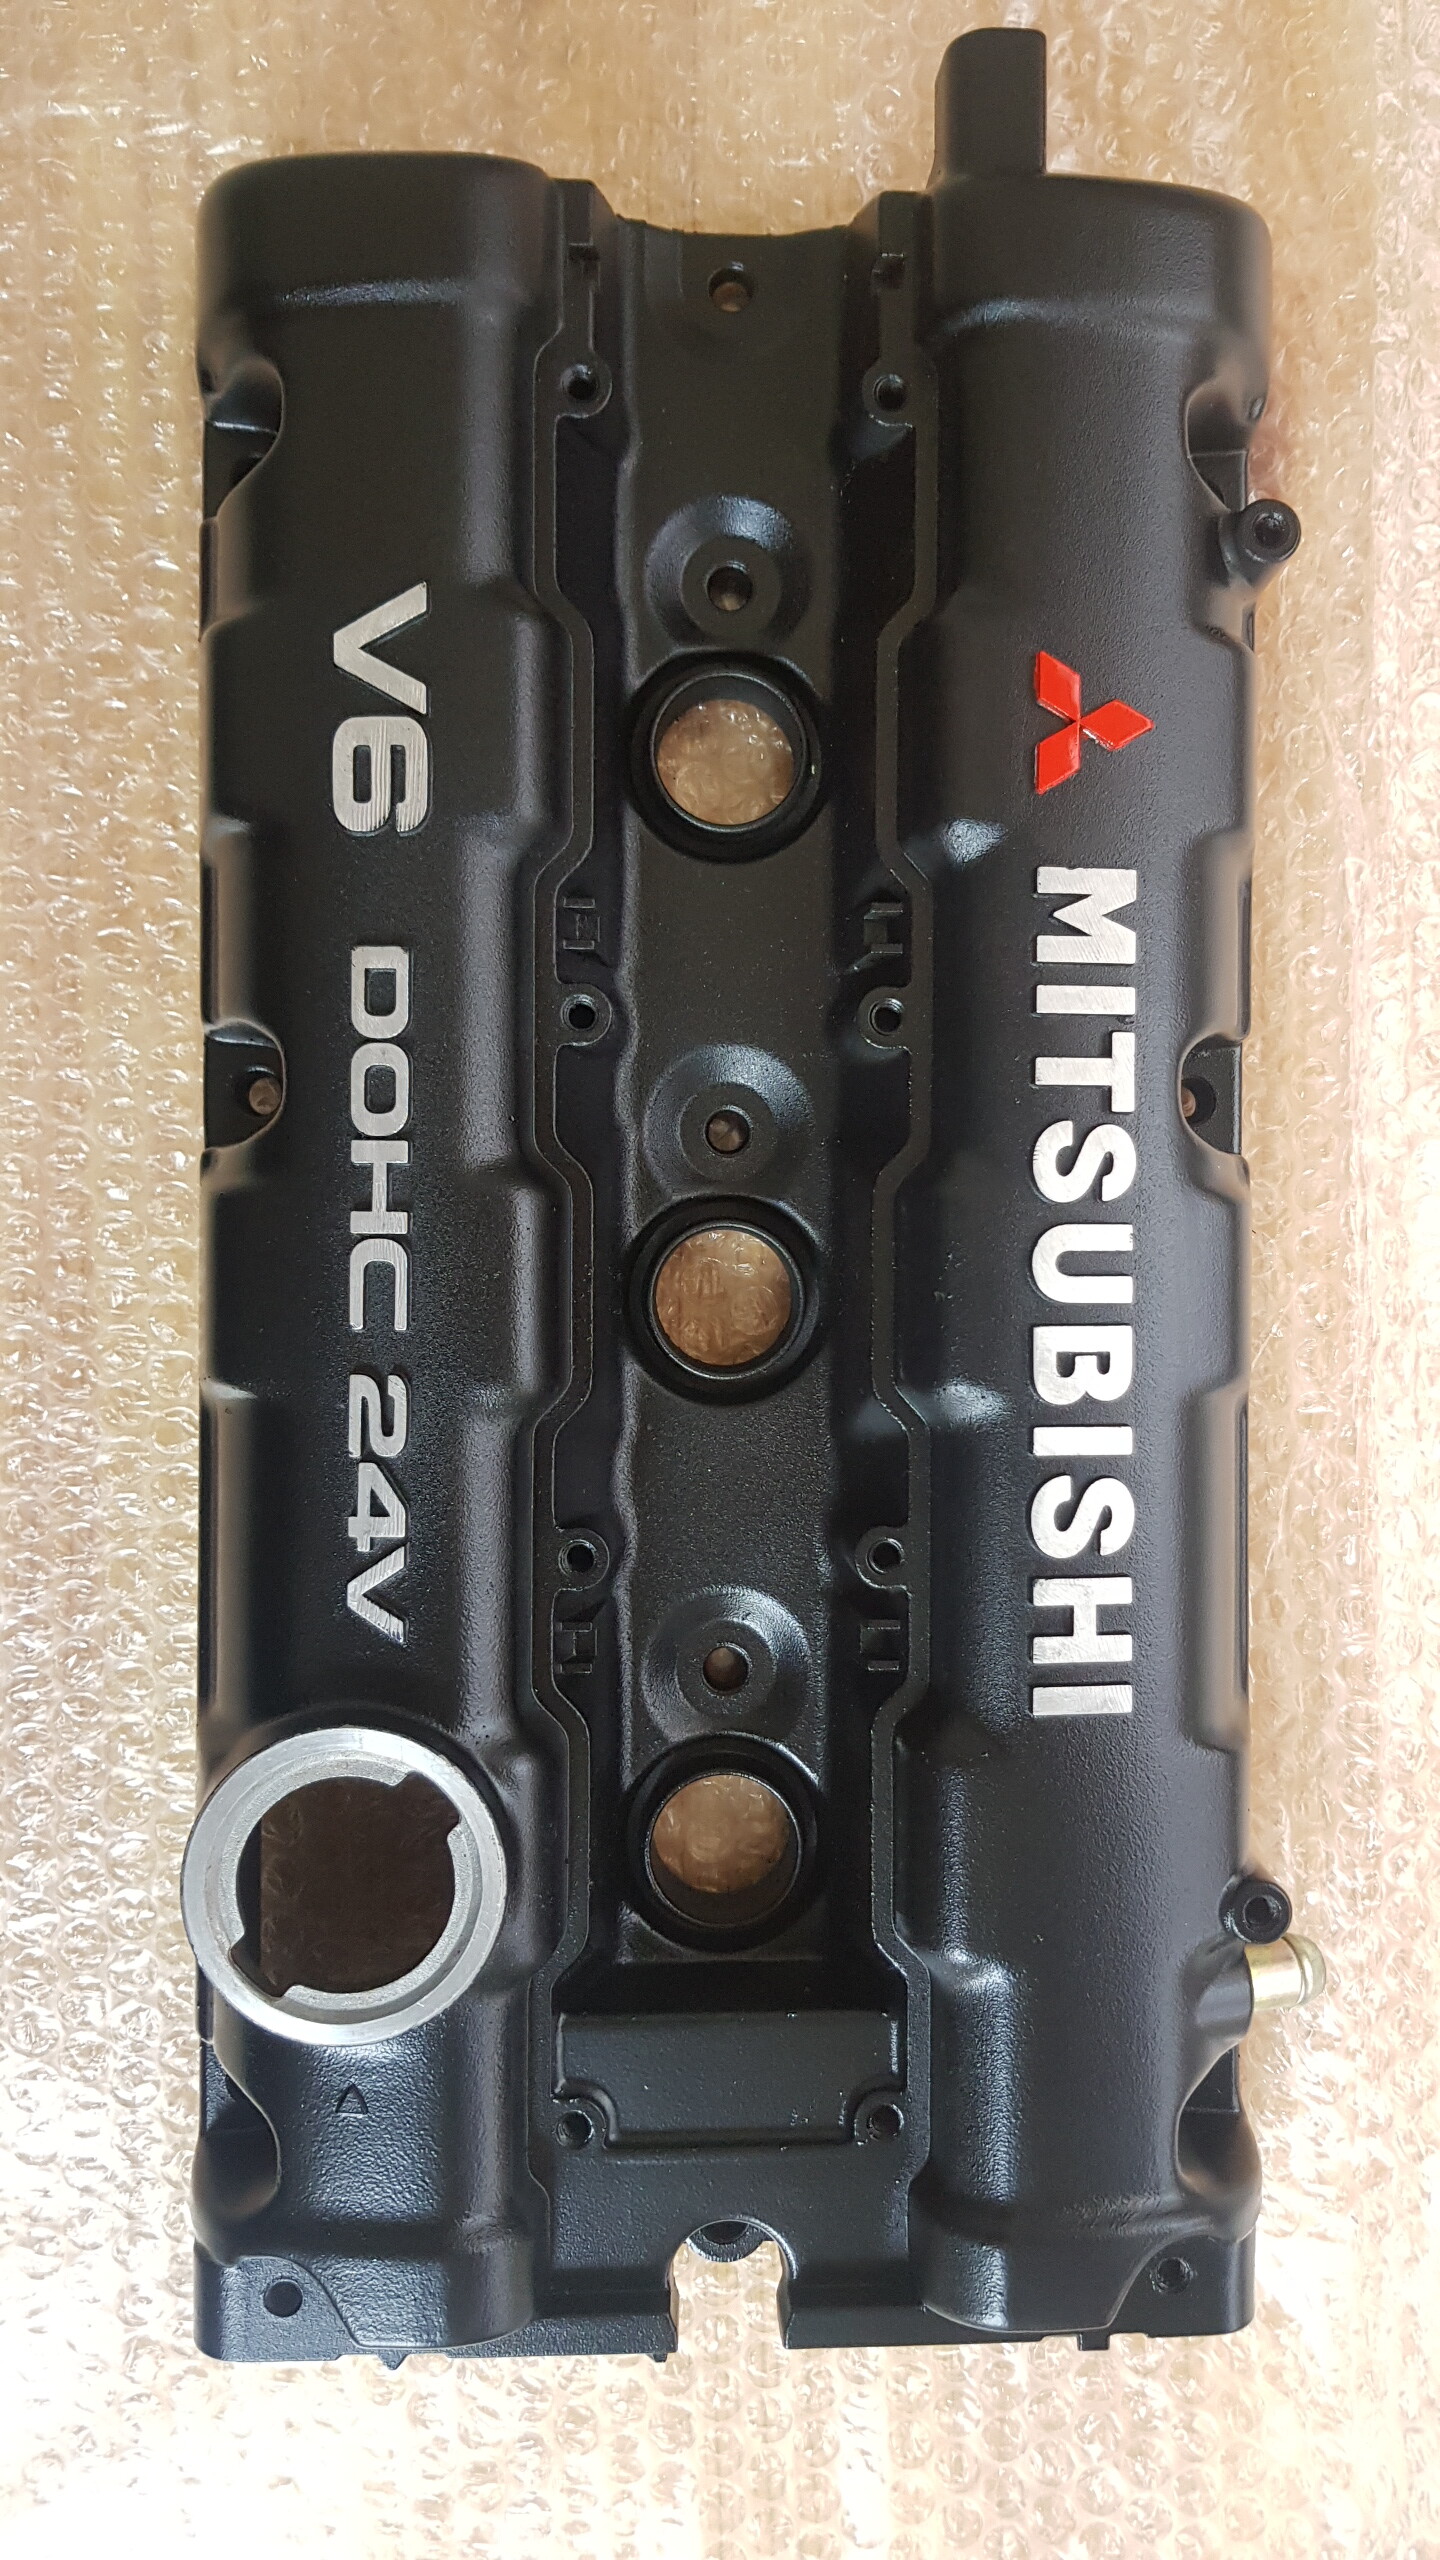
I personally love the factory rocker cover finish.
I use StrypIt paint stripper and then VHT wrinkle black paint, gives a factory look if you cure the paint to get the wrinkle effect tight.
3 Likes
I do like this look. Did you use the VHT wrinkle black brand, or just any VHT paint?
That looks really good. How does it fair in the long term with a hot turbo engine?
I’ve had that VHT wrinkle painted cover on since July 2018 and it looks the same today as it did back then. If you search for vht black wrinkle on eBay, its that stuff about £8.95 a can I use.
Prep is critical for an even tight wrinkle finish and there must be absolutely no surface contaminants or the paint wont stick very well and you’ll initially get sunken pitting as you spray coats on and then areas will dry with a very loose wrinkle effect. Follow the instructions on the can strictly.
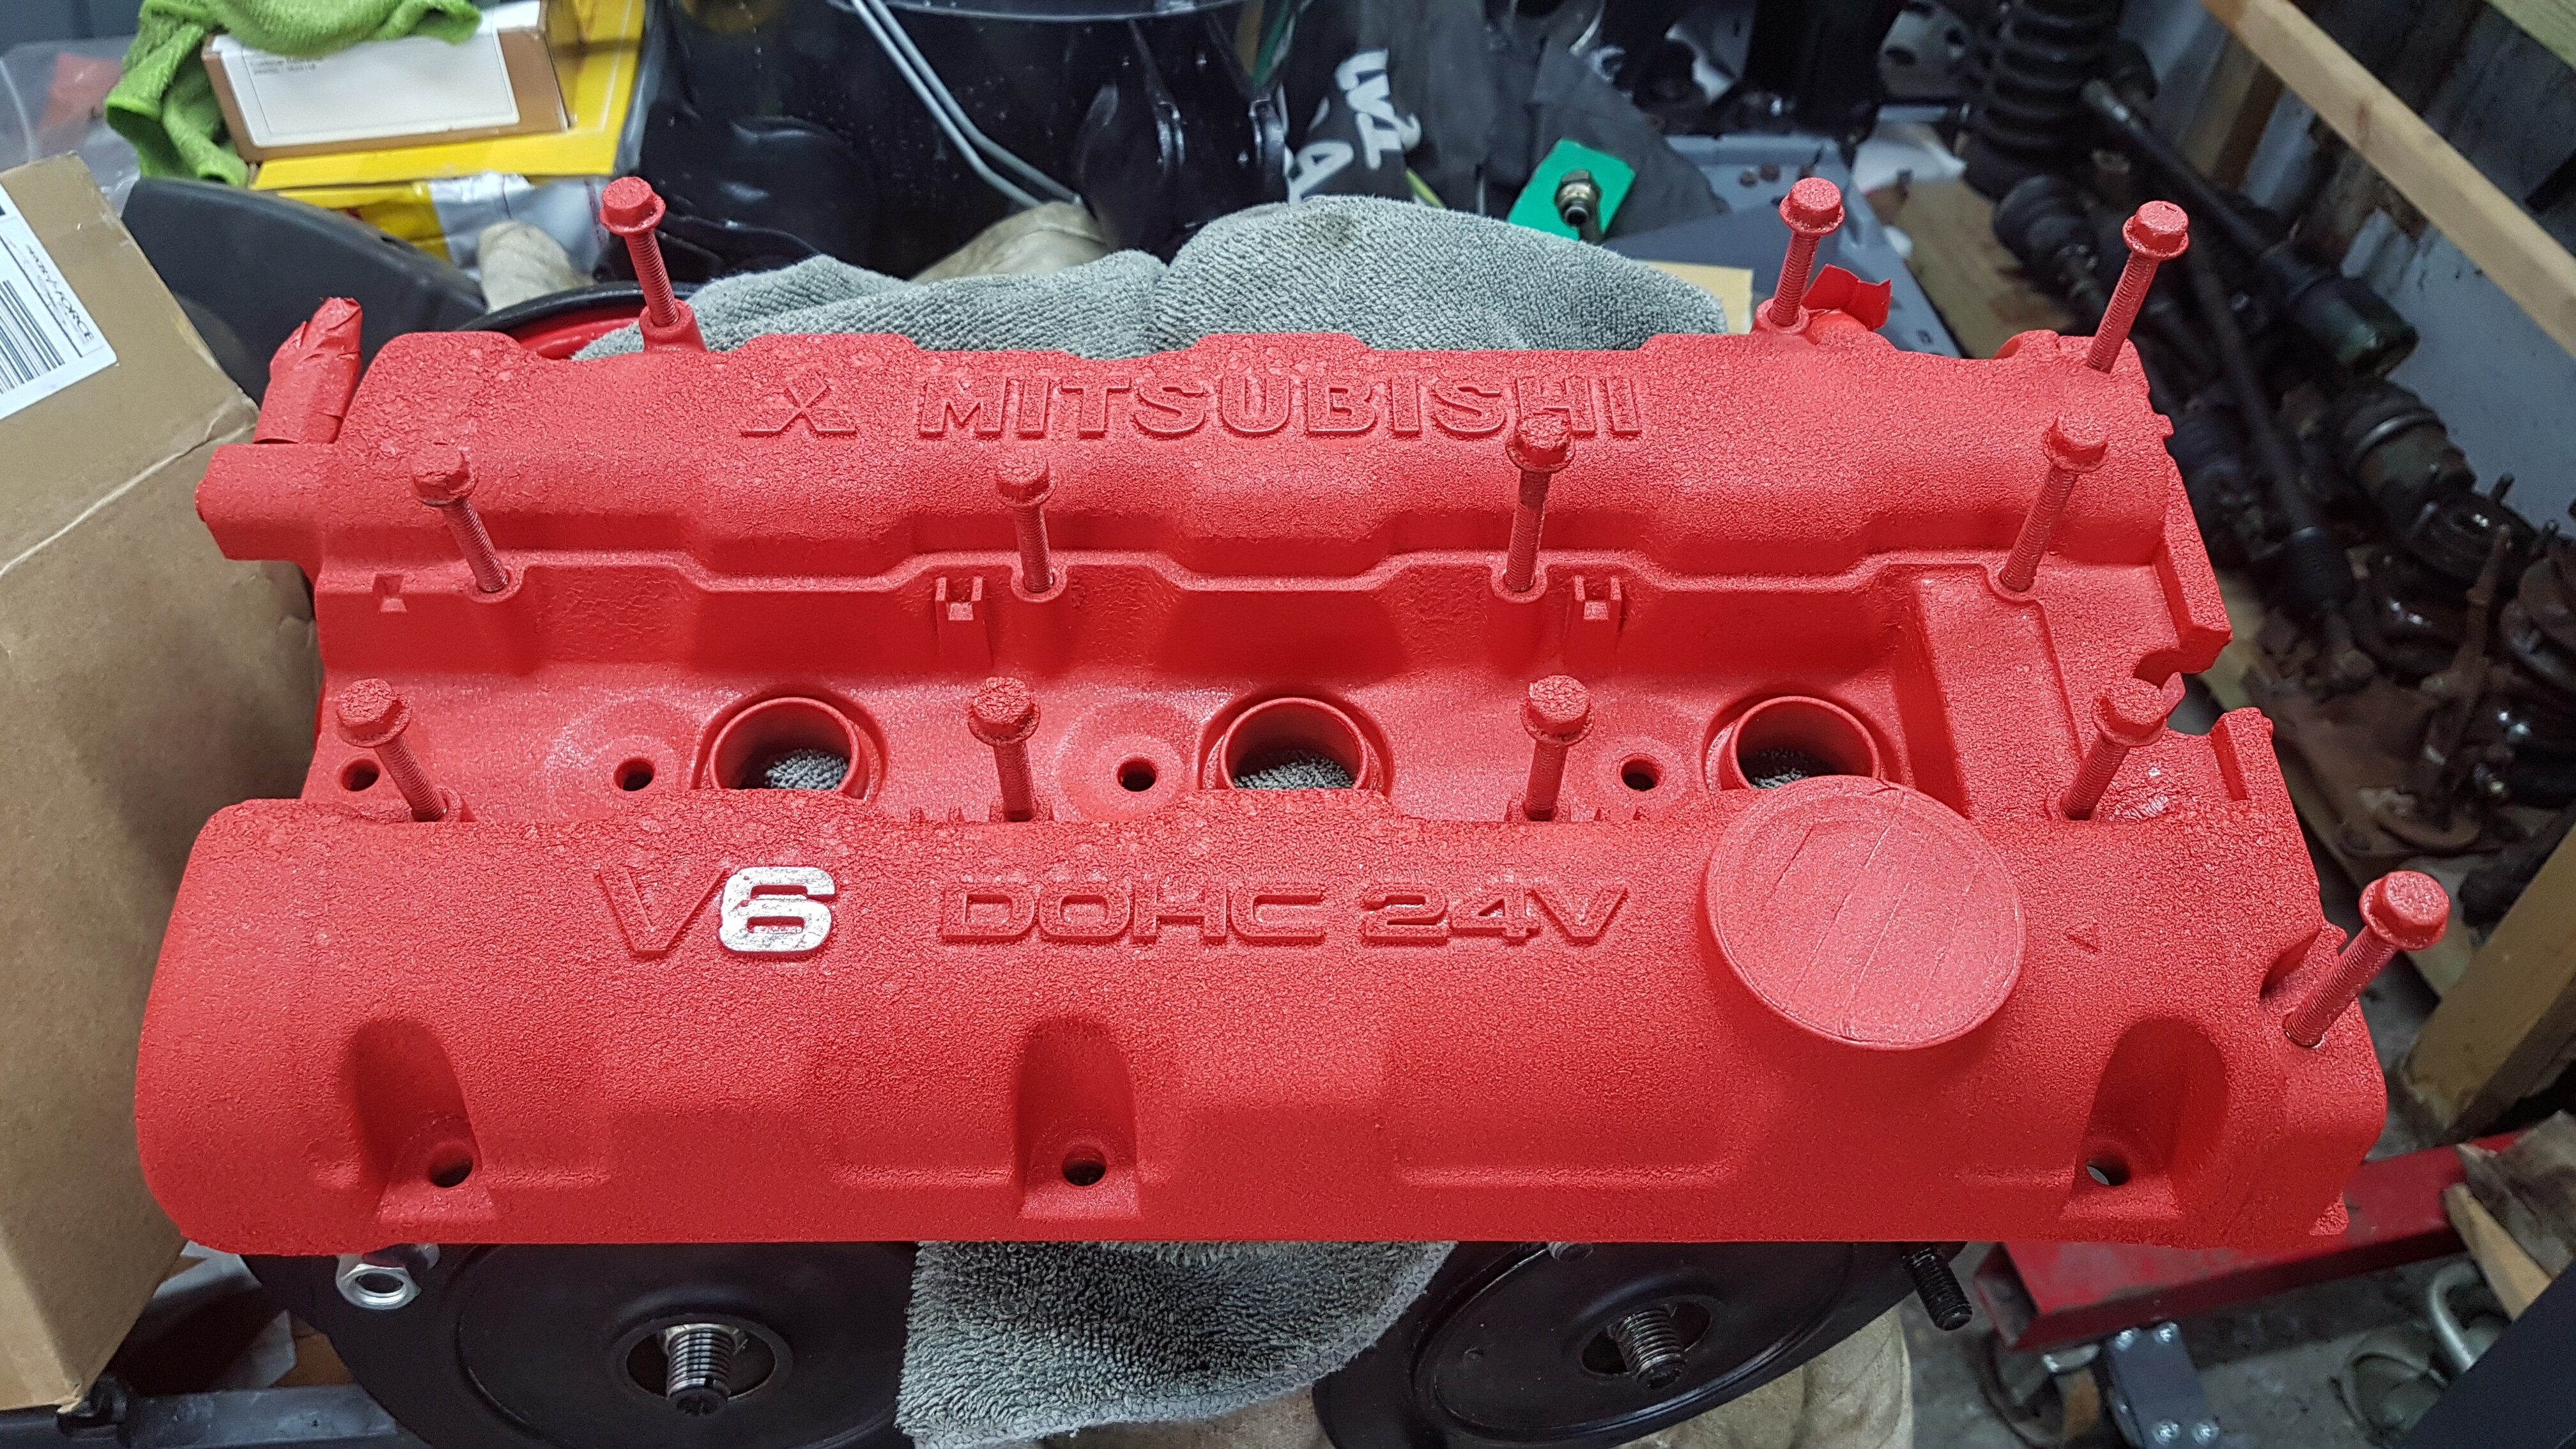
Here’s a red one I have done but am not happy with (ignore the fact I started to rub off the lettering)…
3 Likes
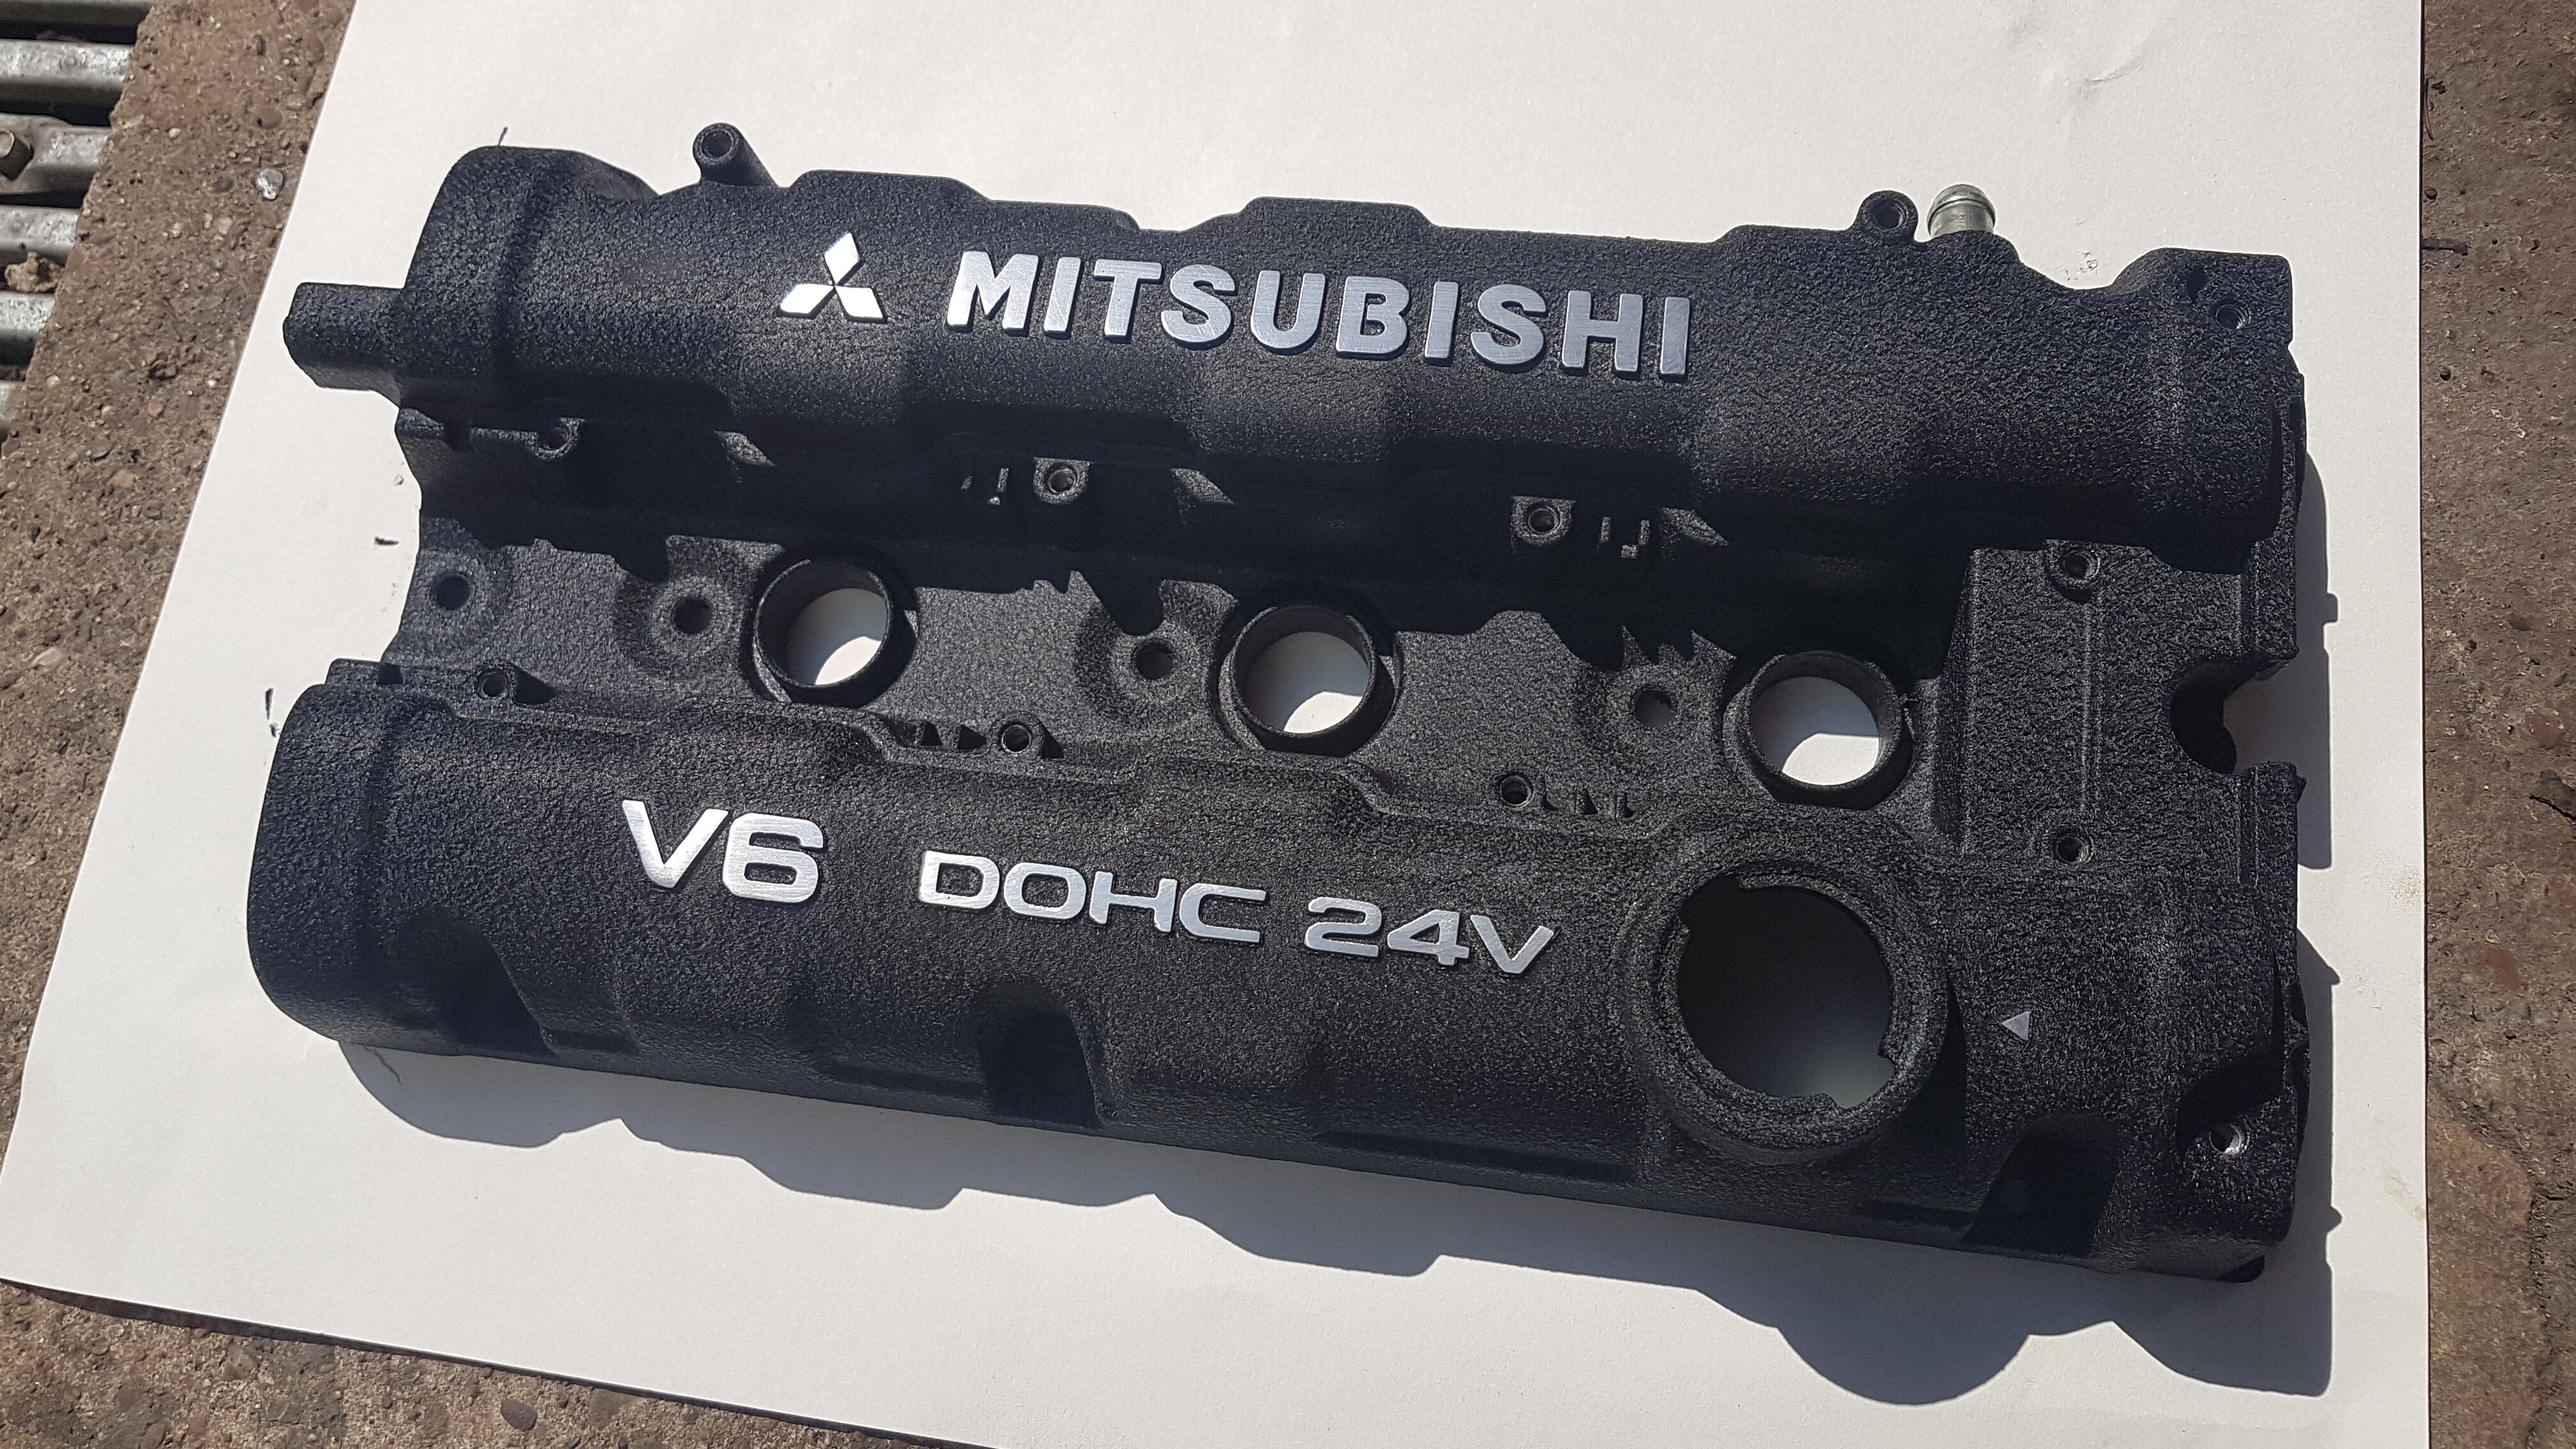
Wrinkle paint in a can is widely available in most retail auto shops and done properly can turn out really nice. I recently restored my rocker cover and learnt a couple of tricks along the way.
First problem I encountered was an excessive amount of sludge and grime inside the rocker cover due to probable lack of regular oil changes. There are several suggested products and ways on You tube to clean this up with but nothing really was convincing. I was also concerned about what was going on and what would happen inside the inaccessible breather chambers inside the roof of the cover. I ended up cleaning the rocker cover inside and out using a paint brush and liberal amounts of petrol, working the petrol well into all corners and chambers of the rocker cover and giving it a good slosh around and allowing to drain off. I then used the jet of a garden hose (yes water) to lift off and clean away remaining deposits including blasting down into the breather pipes to remove the dissolved sludge from the chambers. This cleans it up really well but not good enough for painting and has problems with potentially rusting the steel pipes and inside the baffled breather chamber etc. To combat this I gave it a quick blow out with an compressor and next bathed and washed the cover in a bucket of isopropanol alcohol (meths or ethanol would be fine too) which removes any residual greasy film and absorbs all remaining water. A dry off with clean tissues or rags, air gun, and then application of a heat gun (be careful because alcohols are flammable) quickly evaporates any remaining alcohol (with its dissolved water) resulting in a spotlessly clean and dry rocker cover ready for painting.
The common problem with the factory paint is flaking (albeit after perhaps 20-30years) which I believe is due to aluminium not being a good base for wrinkle paint (and most paints) to stick to. So I decided to apply an etch primer first (before I painted this, I carefully applied a light thin coating of paraffin grease to all the protruding letters and numbers - stops paint sticking to a surface) . Following this, I carefully masked around the Mitsubishi triangles and proceeded to paint these with an automotive red lacquer paint. Once thoroughly dry, I then reapplied a light coating of paraffin grease to all the letter/number surfaces and the newly painted red triangles. Then I applied the black wrinkle paint, carefully following the written instructions precisely… the highly anticipated result: damn pathetic and very disappointed! There was very little wrinkle effect and it was really patchy. All considered, despite room temperature supposedly being good enough to achieve the wrinkle effect, I figured the mid winter timing of my rocker cover restoration was the likely culprit. So I once again recoated the entire surface in the stated heavy criss-cross manner and put it straight into a pre warmed kitchen oven, resulting this time in wrinkle perfection.
Once cured I was able to fingernail scratch away the wrinkle paint on the pre-greased profiles, revealing the red triangles and exposed aluminium lettering and numerals.
I am very happy with the finished product, looking fantastically OEM and hopefully lasting another 30 years!
I’ll try and upload some photos soon.
4 Likes
Oooops. Forgot to mention. Used paint stripper to react and start lifting the old flaking paint, and removed the stripped paint with a hand and electric wire brush. Takes 2 applications of paint stripper to remove all traces of old paint with a wash in the isopropanol alcohol after final strip to remove any residual paint stripper
2 Likes
Thank you so much for the replies, it will really help! I also have problems with dirt in those oil gallery things in the cam cover. I will try the method you mentioned, and if that does not work the. I will have to try a method shown on a 3SX post, which involved drilling out the welds. Thanks again! 

Oooooooow. Imo drilling out the welds (and I did consider it initially) to get in and clean the galleries might be a bit extreme. I’d also be a little concerned about how to re-weld or re-rivet the baffle plates back in place in a way that is non destructive and be guaranteed not to fail and drop hardware back into the motor.
Oil sludge is very dissolvable in petrol and with enough “sloshing” will remove the majority of it. Water jetting will further “lift off” any loose or stubborn deposits. A couple of early oil changes with synthetic oil and a new filter each time will help dissolve and filter any remains. This is all very easy and has peace of mind that no metal filings or pieces are going to end up in your engine.
1 Like
Thanks for the reply! I have since found a place about 40 Mins from me that has an ultrasonic parts washer, so I might try them first. I agree, I was hoping I would only have to do the drilling method as a last resort. I’ll see how they look after the ultrasonic cleaning, and if that doesn’t work I’ll try the petrol method. Thanks again!
1 Like